
![]()
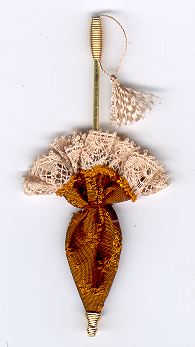
This is the alternative to the open parasol. Every lady of the day had to protect her skin....(said with a southern accent for effect). Dollhouse size 1:12 scale.
This idea and design was donated by me...Michelle Mahler.
![]()
Closed Parasol
Parasol Parts: Bead tip, Handle
and Shaft
Fabric and trim of your choice.
Needle, Thread and Glue
|
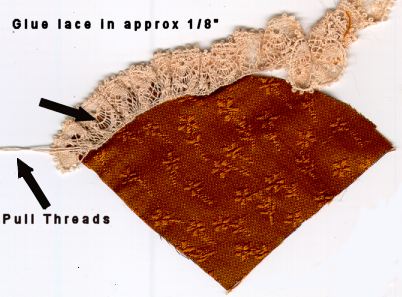
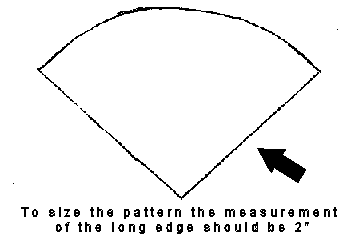
Step 1 Cut out the pattern using the fabric you have selected. Trim the top raw edge with lace or others fine trim. I have used lace for this sample. Tip: pull the slightly heavy thread in the header of the lace to gather. Most all fine cotton laces have these header threads. Adjust the gathers evenly.
Click
Here for Pattern.
Step 2
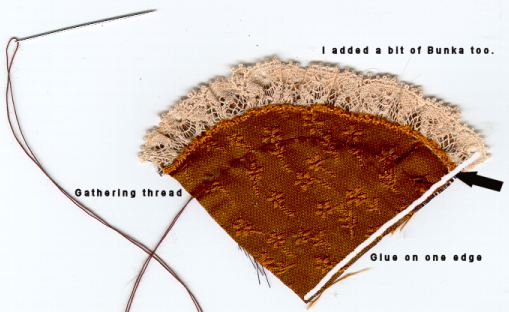
Hand baste a running stitch approximately 1/2" down from the top edge (the one you just applied the lace or trim to). Leave the stitches out of the 1/16" seam allowance on either long edge. Run a tiny bit of glue along one long edge and glue right sides together, but leave the last 1/32" at the tip without glue. After drying, turn your parasol cover right side out.
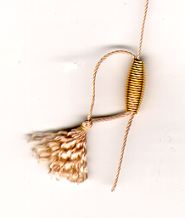
Step 3 & 4 Make a tassel out of thread or raveled fabric. Leave 2 tails a couple of inches long. Thread one end of the tail in the top of the handle bead and the other in the bottom of the handle bead. Glue the bead and tassel to the parasol shaft.
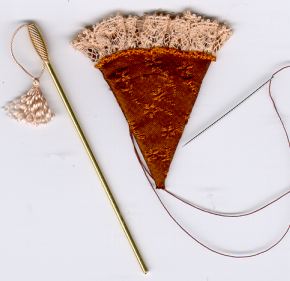
Step 6 Apply some glue to the inside lower tip (the pointy end) of the parasol cover. Slide the parasol shaft through the parasol cover out the end. If it does not fit you may need to snip the end off a bit. Just a bit though!! With the needle on the outside, pull the gathering threads on the parasol cover very tightly wrapping around and tie with a knot. Apply some glue to the inside around the gathered area. Push, squeeze and adjust the gathers evenly to form a pleasing look. Glue the parasol tip bead on the end being sure to cover all raw edges. Adjust the position of the shaft by turning so that the tassel is lined up correctly.
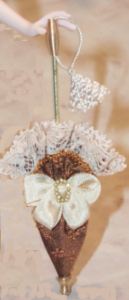
Final Decorate to your heats content.
|
![]()
Thank you for visiting my site and hopefully you enjoyed my tutorial.
Just as a gentle reminder, that tutorial was written to help to stimulate your creativity.
This Tutorial, Pictures, & Instructions are copy-righted & are not to be used as a tutorial of your own.
This means you may not copy and post this tutorial to your own website, or print it out and sell or distribute it as your own.
![]() [an error occurred while processing this directive]
[an error occurred while processing this directive]