
![]()
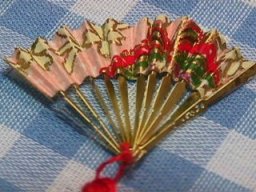
It may take you more than a minute but this fan is Gorgeous and worth the effort.
This tutorial was generously donated my IGMA Artisan Kathi Mendenhal. Isn't she a Doll !!!
![]()
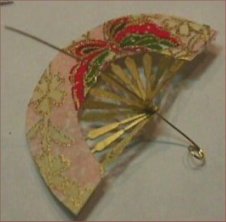
A Fanciful Fan !
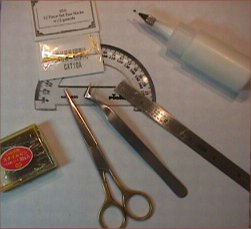
Tools
and Supplies
Fan Stakes (Cats Paw 10A)
Pretty paper or thin fabric
6 28
32 gauge wire
6 six strand embroidery floss
(Separate into
two singles and 1
four ply
strand)
Tacky glue, Scissors, Cardstock, Protractor, Pencil/pen
|
Step 1
If you have a protractor and a copier, copy the protractor face down. You can complete this project without the copier, but you HAVE to have a protractor. Draw a straight line about three inches long. Mark the center. Place the center of the protractor on the center mark of the line and proceed to mark every 15° until you reach 180°. There will be 13 lines. (You will only use 12 as guides).
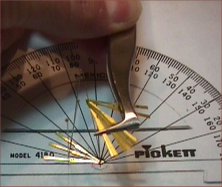
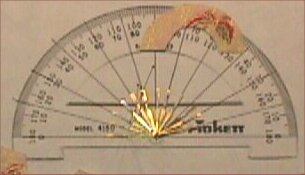
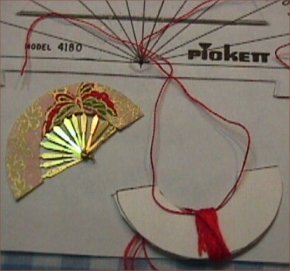
Step 2 Open your package of fan stakes and look for the 2 ornate guards. These are the outside stakes. Separate them from the rest. There should be two guards and 10 stakes.
Step 3 Now, the stakes have to be laid out. Place 1 Guard at the 180 (0) degree mark, and then one each 15 degrees from that until they are all placed and a guard stake is at each end. Depending on the size of your pin, place a pin towards the base between each stake to stabilize them. You will notice them (barely) in steps three and five. (I will tell you, this is fiddly. Take your time. This project took me about 4 hours. I did a load of laundry during my leave it alone time.)
Step 4 Each must be threaded together in order and then laid back in the same order. Otherwise it will not fold. You can do this by threading on a needle or beading needle and poking back into the work-board.
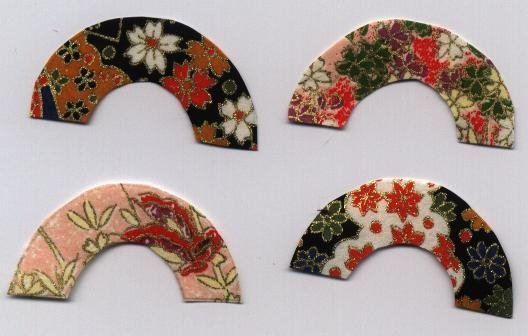
Step 5 You can use the pattern provided, or make a pattern of your own to make the leaf. (The fabric covering.) My pattern should be a little more elliptical, and I trimmed after placing it on the stakes. I have corrected the pattern somewhat that we offer you here. Test it though.
Step 6 If using a decorative paper or fabric copy your pattern of the leaf to cardstock. Cut it out carefully leaving a stencil or cutout of the outline of the leaf. This is to use as a window to line up the design in your paper or fabric with the pattern on your leaf to see how the pattern will appear (try origami paper!). This can also be use to trace out your pattern.
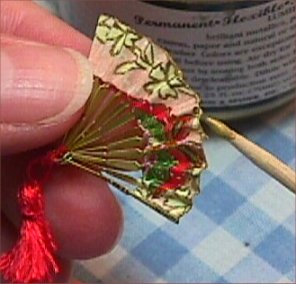
Step 7 Cut out the leaf and test it on your fan. If all is good for you, then place the tiniest bit of glue on each stake but one Guard. The leaf is placed on all stakes on the same side, EXCEPT on one guard, that one is on the underside. That way there is a decorative edge on either end when the fan is closed. 
Step 8 Leave it alone for awhile, go fold a load of laundry, or do some dishes. Give it a rest.
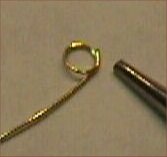
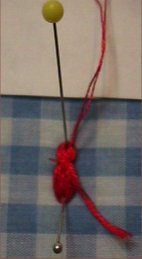
Step 9 Now that you are back, have a refreshed feeling, take the wire and a rounded tip pliers and create a ring of the wire. Leave a bit of the wire jutting out. Now thread the stakes on the wire, all in the correct order. Close the ring. Whew, that was fine. We are nearly finished.
Step 10 Take 6 inches of the floss and separate two single strands. Leave 4 strands together. Lay one of the single strands across a ¼ wide piece of card. Wrap around until you are out of floss. Tie off the single strand at the top. Tie it tightly. Remove it from the card, pin both ends taught to your work board. Run the last piece of floss under the floss bundle and tie it tightly near the top. Thread the top strand onto the ring you created and tie on the tassel to the ring.
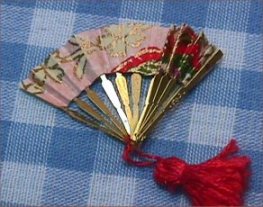
Step 11 Press a fold into the center between each stake. Crease and fold well. VERY CAREFULLY fold up the fan.
Step 12 Run a bit of gold paint along the top edge to finish off your leaf.
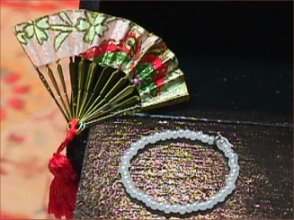
The Finale....ooohhh...aahh
|
![]()
Thank you for visiting my site and hopefully you enjoyed my tutorial.
Just as a gentle reminder, that tutorial was written to help to stimulate your creativity.
This Tutorial, Pictures, & Instructions are copy-righted & are not to be used as a tutorial of your own.
This means you may not copy and post this tutorial to your own website, or print it out and sell or distribute it as your own.
![]() [an error occurred while processing this directive]
[an error occurred while processing this directive]