![]()
What do I do with Chenille??? Well here are an absolutely adorable chenille bedroom slipper for your doll or dollhouse. If you want to make them for a specific doll then you will need to upsize the pattern as they are child size 1:12 scale.
This idea and design was generously donated by Victoria Aunger.
![]()
Chenille Bedroom Slippers
Tools
and Supplies
Small piece of Fine Cotton
Small
piece of
Various sizes and colors of chenille
Misc Thread colors, Glue, Scissors,
|
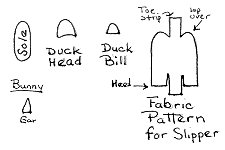
Step 1
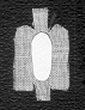
You need to adjust the sole of the pattern to fit your dolls foot or size of slipper you desire. Cut sole out of index card. Glue sole to fabric underlining of slipper per first picture. Place the foot you used as a size guide on the fabric side of lining (card sole will be on outside). Fold up sides and lap over the toe end and glue. Then glue the toe and heel strip. Repeat for second slipper. You will now have a slipper lining per the second picture.
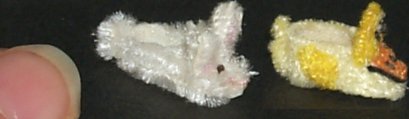
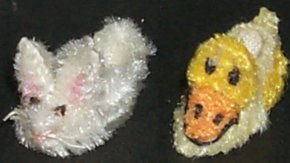
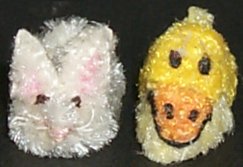
Step 2 Cover outside body of slipper lining with repeating rows of chenille. See arrows below. White for Bunny Slipper light yellow for Duck Slipper.
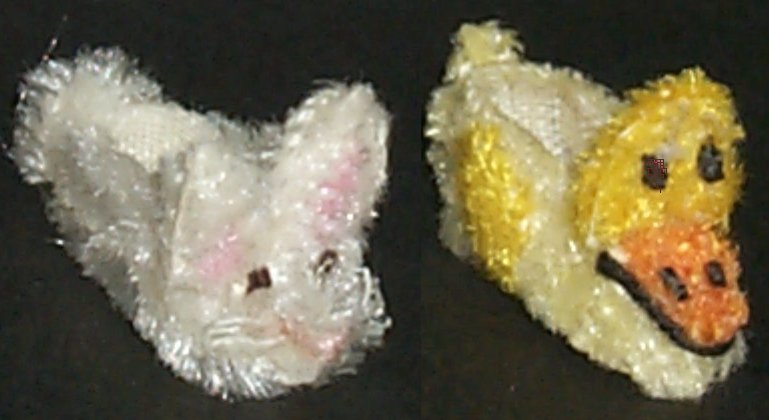
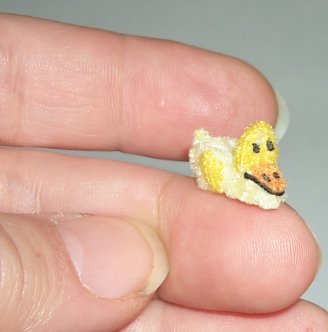
Step 3 Duck - Cut Head and Bill out of index card. Glue orange chenille to cover entire bill. On the Bill stitch 2 tiny stitches using black thread to create the nostrils (per pictures). Use yellow chenille and glue to cover head pattern peice. Glue the the Bill on first at the toe of the slipper. Now Glue the head on right behind the Bill in an upright manor. Glue 2 small snippets of yellow chenille on the side to form the wings of the duck. Take a small snippet of the light yellow chenille told in half and glue so that at the fold it is kind of pointed. glue on at the back to for the tail. Bunny - Cut of the ears from index card. Glue a tiny stripe of pink chenille down the center. Cover the outside edge of the ear with white chenille. Use a piece of the larger chenille for the nose. Glue a tiny piece on the upper toe portion down the center. Pinch it to shape. Glue the ears on per the picture. Glue a curled or knotted little piece of chenille on the end for the tail.
Step 4 Duck - Make 2 French knots out the black thread or glue on no hole beads for eyes. Glue a piece of black thread around bill as pictured. Bunny - Stiffen white thread with glue. Now using this thread stitch thru one side and out the other of the Bunny's nose and snip with out knotting. Leave a loose end on either side. Repeat three times and trim. These are the whiskers. Stitch at the very end of the nose several stitches of pink thread (right next to each other like a satin stick) to form the nose. Glue tiny pieces of black thread knotted or no hole beads for the eyes.
Finished size
|
![]()
Thank you for visiting my site and hopefully you enjoyed my tutorial.
Just as a gentle reminder, that tutorial was written to help to stimulate your creativity.
This Tutorial, Pictures, & Instructions are copy-righted & are not to be used as a tutorial of your own.
This means you may not copy and post this tutorial to your own website, or print it out and sell or distribute it as your own.
![]() [an error occurred while processing this directive]
[an error occurred while processing this directive]